
Drywall Anchors vs. Studs: When Each One Is the Right Choice for Wall Mounting

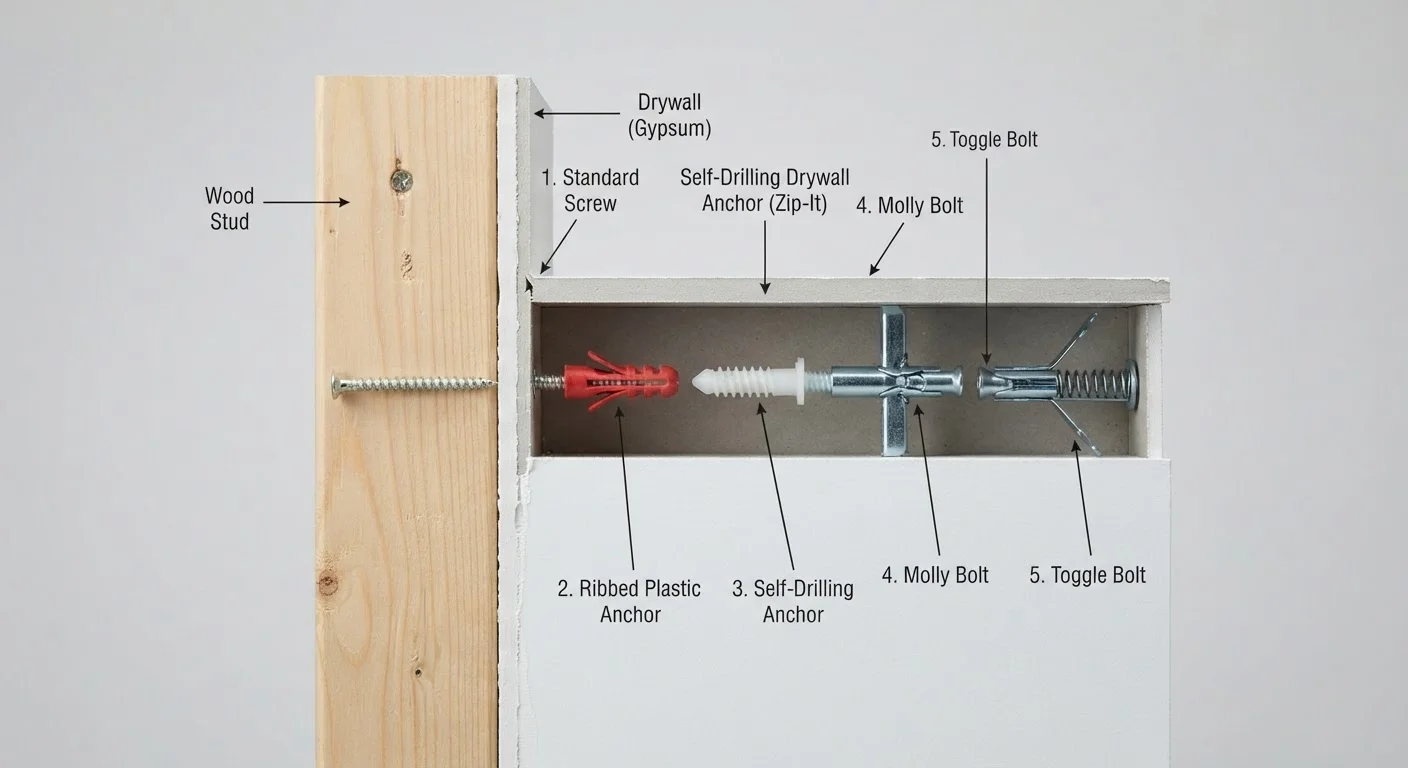
Photo: InsightsBlock.com | Access Information With Ease editorial
Key Takeaways
- Studs provide far greater holding strength because screws bite into solid lumber, not just gypsum.
- Drywall anchors are designed for lighter loads and offer placement flexibility when studs don't align.
- Anchor weight ratings are maximums - always apply a safety margin, especially for frequently shifted items.
- A stud finder, a knock test, or a thin probe can reliably locate studs before you drill.
- Never hang heavy or safety-critical items using only drywall anchors - use studs or a wall-mounted backing board.
What the Structural Difference Actually Means
Standard interior walls are built from vertical wood or metal studs - typically spaced 16 or 24 inches apart - covered with sheets of drywall (also called gypsum board or sheetrock). Studs are the skeleton; drywall is the skin.
When you drive a screw directly into a stud, it grips roughly 1.5 inches of dense lumber. That's why stud-mounted hardware can safely support hundreds of pounds. When there's no stud behind your chosen spot, you're driving into gypsum - a brittle, crumbly mineral that offers very little thread engagement on its own.
A drywall anchor solves that problem by distributing the load across a larger surface area of the drywall panel itself. Most anchors work by expanding, toggling, or threading into the back side of the panel, spreading the pull-out force rather than concentrating it on a tiny screw hole. The trade-off is that even the best anchors are working with a weaker base material, so load limits are considerably lower.
| Criterion | Studs | Drywall Anchors |
|---|---|---|
| Holding strength | Very high (hundreds of lbs) | Low to moderate (10-100 lbs) |
| Placement flexibility | Fixed at 16" or 24" intervals | Anywhere on the wall surface |
| Tools required | Stud finder, drill, screwdriver | Drill or just a screwdriver (type-dependent) |
| Best for | TVs, cabinets, heavy shelving | Art, mirrors, lightweight shelves |
| Wall damage on removal | Small screw hole, easy to patch | Slightly larger hole; anchor type varies |
| Skill level needed | Beginner to intermediate | Beginner |
Types of Drywall Anchors and Their Load Ranges
Not all drywall anchors are equal. Understanding the main types helps you match the anchor to the job:
- Plastic expansion anchors (plug anchors): The most common and least expensive type. They expand as the screw is driven in. Generally rated for 10-25 lbs in vertical (shear) loads. Suitable for picture frames and lightweight décor only.
- Self-drilling anchors (E-Z anchors): These thread directly into drywall without a pilot hole and offer better holding power - often 25-50 lbs. Good for medium-weight shelves or towel bars.
- Toggle bolts (wing anchors): A folding metal toggle expands flat behind the drywall, providing the widest load distribution. Many are rated 50-100 lbs in shear, making them the strongest anchor option. Still not a substitute for a stud in most heavy-duty applications.
- Snap toggles (strap toggles): A refinement of the toggle bolt that leaves a threaded receiver in the wall, allowing screw removal and re-insertion without losing the anchor. Useful for items you may need to adjust.
Always check the manufacturer's rated load for the specific anchor size and drywall thickness you have. Ratings are maximums under ideal lab conditions - apply a meaningful safety margin in practice, especially for items that shift or vibrate.
Check Your Wall Construction First
How to Locate Studs Reliably
Before reaching for an anchor, check for a stud. You have three practical approaches:
- Electronic stud finder: Slides along the wall and signals a change in density. Accurate on most standard drywall, though metal pipes and electrical conduit can produce false positives. Calibrate on a clear section of wall first.
- Knock test: Tap the wall with a knuckle moving horizontally. A hollow sound means open cavity; a slightly duller, denser sound indicates a stud behind the surface. Takes practice but costs nothing.
- Thin probe method: Drive a thin finish nail at an angle in an inconspicuous spot. If it meets resistance about an inch in, you've found lumber. Mark the edges by probing a half-inch to each side, then center your screw between them.
Studs in US residential construction are most commonly 16 inches on center (measured from the center of one stud to the center of the next). Once you find one, measure 16 inches in either direction to predict the next. Corner studs and door/window framing often add extra lumber, giving you more options than you'd expect.
For storage projects where stud alignment matters long-term, our article on built-in shelving vs. freestanding units explores how anchoring strategy affects your storage choices. And when your drilling leaves small gaps or holes to fill afterward, see our guide on choosing between caulk, spackle, and wood filler for clean finishing results.
Making the Safe Choice for Each Project
A practical rule of thumb: if an item weighs more than 20 lbs, or if it could cause injury or significant property damage if it fell, mount it into a stud. This includes televisions, large wall-mounted cabinets, heavy mirrors, and bike storage hooks.
When studs simply aren't where you need them for a heavier load, the correct solution isn't a stronger anchor - it's a backing board. Fasten a horizontal piece of lumber (a 1×4 or 1×6 works well) across two adjacent studs. The board now becomes a continuous mounting surface, and you can position your hardware bracket anywhere along it. This approach is commonly used for grab bars, floating vanities, and wall-mounted media units.
For anything under about 20 lbs - decorative plates, small framed prints, lightweight floating shelves, coat hooks - a properly rated drywall anchor is a perfectly safe and practical solution. Follow the anchor's installation instructions carefully: using the right drill bit size (when required), not overtightening the screw, and keeping the load within the rated limit.
One final caution: avoid stacking multiple anchors to chase a higher combined rating for a single heavy item. Load distribution across independent anchors is unpredictable, and this practice can create a false sense of security. Stick to the appropriate method for the weight class of your project.
The content provided on our blog site traverses numerous categories, offering readers valuable and practical information. Readers can use the editorial team’s research and data to gain more insights into their topics of interest. However, they are requested not to treat the articles as conclusive. The website team cannot be held responsible for differences in data or inaccuracies found across other platforms. Please also note that the site might also miss out on various schemes and offers available that the readers may find more beneficial than the ones we cover.